Dec 122012
 

Applesauce Cake
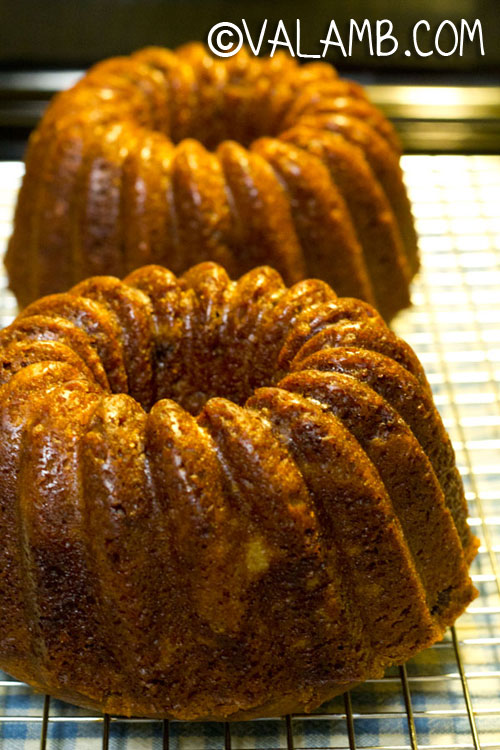
One of our favorite family traditions and greatest holiday joys is receiving one of Mama Childs’ Applesauce Cakes. We’ve been known to fight over them, hide them, or do whatever it takes to claim the prize of this wonderful winter treat. This delicious cake dates back to Corey’s great-grandmother, Delpha Belle Garver Childs, affectionately known as Mama Childs. She was a true farmer’s wife, canning in the summer, raising backyard chickens, and being known for her hand–me-down family recipes. Born in 1892 she lived into her 90’s. Although Mama Childs is no longer with us, her Applesauce Cake continue to be a family tradition.


 Posted by at 11:00 am
Oct 262012
 

Whether you are new to cooking or an experienced chef, everyone can use a little help in the kitchen sometimes. Here is a comprehensive kitchen cheat sheet for you to fall back on whenever you are in doubt. We find it useful and we hope you do too!

 Posted by at 3:55 am
Sep 042012
 

zuchinni muffins

I am not much for chaos. I know, four children right! Add to that not being the ideal morning person and well, sometimes there needs to be a backup plan from the very get-go.

When I know mornings are certain to be hectic, such as the first week of school, I like to bake a batch or two of muffins Sunday afternoon. Because these are sure to be breakfast on the go, I like the large double-size muffins that can be individually wrapped in sandwich bags. That way I can keep a basket full right on the kitchen table.

Since zucchini is still in season here, I decided on Zucchini Chocolate Chip Muffins, a favorite of the kids. As fall approaches I’ll make Banana Nut, Apple Cinnamon, and Pumpkin Spice Muffins too.

zuchinni muffins

Zucchini Chocolate Chip Muffins
 

Ingredients
  • 1½ cup flour
  • 1 teaspoon ground cinnamon
  • ½ teaspoon ground nutmeg
  • ½ teaspoon baking soda
  • ½ teaspoon salt
  • ¼ teaspoon baking powder
  • 1 cup sugar
  • 1 cup finely shredded unpeeled zucchini
  • 1 teaspoon vanilla
  • 1 egg
  • ½ cup cooking oil
  • ½ cup chocolate chips

Instructions
  1. Preheat oven to 350 degrees F.
  2. In a medium size bowl stir together flour, cinnamon, nutmeg, baking soda, salt, and baking powder. Set aside.
  3. In a larger bowl beat together the sugar, shredded zucchini, vanilla, and egg. Add oil, mix well. Stir flour mixture into zucchini mixture, half at a time.
  4. Gently fold in chocolate chips. Mix well.
  5. Spoon batter into well greased muffin tin. Bake for 35-40 minutes or until wooden pick inserted near center comes out clean. (It’s hard to judge these by color.)
  6. Remove from oven and let cool in pan for 15 minutes.
  7. Remove from pan and cool thoroughly on a rack. Place each muffin into individual sandwich bags.
  8. Makes 6 large or 12 small muffins.


 Posted by at 8:24 am
Aug 272012
 

buttermilkI don’t know if it is from years of growing up on a dairy farm or if I am just a milk-yogurt-cheese-butter addict, but at any given time our frig is half full of dairy products. And ever since I began making our Rosemary Cornbread you can find a large container of buttermilk in there as well.

With it always on hand, I have found tons of other uses for the thick, delicious stuff. We make pancakes and biscuits and even salad dressing.  But when I recently read in one of my farming magazines that I could make my own, I was truly intrigued.

As it turns out, it is actually quite simple. In addition to a quart canning jar or other glass container with a lid, you will need:

  • ½ cup of store bought buttermilk
  • 1 quart of milk (2%, whole, or raw)

Instructions

Pour buttermilk into clean jar. If this is your first batch, I recommend ½ cup of buttermilk to get started. Then fill the remainder of the jar with milk. Secure lid and shake vigorously. Allow to sit on the counter overnight away from any direct source of heat. Refrigerate after 12 hours.

Every two weeks keep back at least ¼ cup of the buttermilk culture and top off with fresh milk. Because of the amount of buttermilk we go through, I re-culture mine every week.

You can keep this process going for every. And that gets two thumbs up from this farm girl!

homemade buttermilk

 Posted by at 8:00 am
Aug 202012
 

tomato tart

Ever since the first tomatoes hit the farmers market this year, I have been craving a tomato tart.  All warm and savory, it is like being able to taste summer in every bit. I confess, I have never made one before – but I could close my eyes and taste the flavors I was after.

Because I planned on using a fairly shallow tart pan and was certain the dough would hold up, I decided to use the Pâte Brisée recipe. Be sure to read Choosing the Perfect Dough for the Job.

For the Pastry (single crust):

  • 1/2 cup butter, unsalted
  • 1 1/2 cups flour
  • 1/2 teaspoon salt
  • 1/2 teaspoon sugar
  • 1/4 – 1/3 cup very cold water

For the Tart:

  • 3 large Roma Tomatoes, sliced 1/4 inch thick
  • 1 tablespoon Dijon Mustard
  • 1/2 cup Fresh Tarragon
  • 4 oz of Fresh Mozzarella Cheese, sliced 1/4 inch thick
  • 1 tablespoon Olive Oil
  • Salt and Pepper, to taste

Making the Pastry:

Cut the butter into very thin slices and place in freezer for 30 minutes. Meanwhile, mix flour, salt, and sugar in large bowl. Place bowl in freezer for 15 minutes.

Add butter to flour and toss. Using fingers work the butter into the flour with a rubbing action. You still want to be able to see small flakes of butter in the flour. If the butter begins to warm, return bowl to freezer.

Add water, starting with 1/3 cup. Work dough, pressing together. If dough does not begin to hold its shape, add more water, 1 tablespoon at a time. Use only enough to form a ball. It will be crumbly but still hold its shape. Press into disk.

Wrap dough in plastic wrap and refrigerate for 30 minutes to 1 hour.

When ready to use, remove from refrigerator, unwrap, cut in half and roll out on floured surface. Keep the other half wrapped in frig until ready to use.

Assembling the Tart:

Preheat oven to 400 degrees.

Roll the dough out to 1/8 inch in a 12-inch circle. Transfer dough to tart pan with removable bottom. Press dough into corners and trim so it is flush with sides. (I roll my rolling pin across the top of tart pan to cut pastry.) Chill in refrigerator for 30 minutes.

Remove from frig. Brush bottom of pastry shell with Dijon mustard.

Arrange tomatoes on pastry so they overlap slightly. Drizzle with olive oil and season with salt and freshly cracked pepper. Add tarragon evenly over tomatoes. Top with Mozzarella cheese.

Bake tart for 45 minutes or until crust is golden brown. Remove from oven and cool for 20 minutes. Serve warm.

Note: With my first attempt I used Better Boy tomatoes out of the garden. Although delicious, it created too much liquid in the tart. I made the recipe again using Roma tomatoes which resulted in a much more desirable tart. One that was easier to slice and serve.

tomato tart

 Posted by at 7:50 am
Aug 172012
 

peach galette

 peach galette

Now that I found the perfect pie crust to hold its shape with this free form dessert, I was ready to give it another go. You see, I made a peach galette a couple of weeks ago. I took a pretty picture of it before it went into the oven, but by the time it was done I had a perfect mess! The pie crust failed. It failed to hold its shape and it failed to hold its contents. I still had no problem finding eager eaters, but it was hardly a recipe to write about.

peach galette

Why had my delicious, flakey butter crust let me down? As it turns out, my pie dough was perfect — perfect for a pie baked in a pie pan, but I needed more binding for my rustic shaped galette. Be sure to read Choosing the Perfect Dough for the Job. (I’ve copied the recipe here for your convenience.)

For the Pastry:

  • 1 1/2 cup flour
  • 1/2 cup butter, unsalted
  • 1/2 teaspoon salt
  • 1/4 cup sugar
  • 1 egg yolk, beaten (save egg white for later)
  • 2-4 tablespoons very cold water

For the Galette Filling:

  • 4 large peaches, pitted and cut into wedges
  • 1/2 cup sugar, plus more to sprinkle formed galette
  • 2 tablespoons lemon juice
  • 2 tablespoons corn starch
  • Pinch of salt

Making the Pastry:

Cut the butter into very thin slices and place in freezer for 30 minutes. Meanwhile, mix flour and salt in large bowl. Place bowl in freezer for 15 minutes.

Add butter to flour and toss. Using fingers work the butter into the flour with a rubbing action. Continue until dough resembles a course crumble – in this dough you do not want to see small flakes of butter in the flour. If the flour/butter begins to warm, return bowl to freezer.

Add sugar and mix.

Add beaten egg and 2 tablespoons of water. Dump dough onto unfloured surface. If dough does not begin to hold its shape, add more water, 1 tablespoon at a time.

Knead the dough in long smooth strokes three or four times. Form the dough into a ball. Press down forming a disk. (This dough is much smoother than the Pâte Brisée.)

Wrap ball in plastic wrap and refrigerate for 30 minutes to 1 hour.

When ready to use, remove from refrigerator. Unwrap. Using minimal flour on rolling pen, roll out dough on top of the plastic wrap. (See Pâte Brisée)

Making the Galette:

Preheat oven to 375 degrees.

Roll the dough out to 1/8 inch in a 14-inch circle. Transfer dough to a parchment lined baking sheet. Refrigerate until ready to use.

Place peaches in large bowl. Add sugar, lemon juice, cornstarch, and salt. Mix until peaches are thoroughly coated.

Arrange fruit in center of chilled dough, leaving approximately 2 inches around the outside free of fruit.

Gently fold dough up and over fruit. Be sure to press edges together to create pleats to hold fruit.

Brush pastry with egg white and sprinkle with sugar.

Bake for 45 minutes or until crust is golden brown. Remove from oven and let cool on baking sheet. Best served warm.

fresh peaches


 Posted by at 8:10 am
Aug 152012
 

And as many of you know, I am much more into cooking than baking, as I am truly a dump and explore kind of girl. But even so, it was time to make a pie. I have no idea why I don’t make them more often. They seem intimidating, and then I make one, and ask myself for the hundredth time, what was all the fuse about. My mother use to whip up pies, like I do savories. She won so many grand champion ribbons with her pies that the county fair’s homemaking department ask her to take a time out and give someone else a chance. Hmmm, now there is a challenge (and I love challenges!).

pastry dough

So I dug through my old trusted recipe file for my go to pie dough (a hand-me-down from Mom). It had been a while since I baked a pie and was disappointed to be reminded that one of the key ingredients was shortening — hydrogenated oil. Oh, boy, time to tweak the recipe.

After several pies, tarts, and even a galette, I have learned that all pie crusts are not created equal. I perfected my butter pie crust but my galette (freeform) crust failed to hold its shape. So after a lot of reading, testing, and tweaking, I have narrowed it down to two main recipes depending on my needs.

Regardless of which one you use, keep in mind the three cardinal rules when it comes to pastry dough.

  1. Keep it cold.
  2. Work quickly.
  3. The dryer the flakier.

 unsalted butter

Pâte Brisée (broken dough)

This is the dough we think of when we remember our mom’s (or grandmom’s) wonderfully flakey pie crust. This works best for fruit pies, lattice crusts, and savory dishes (for savory pies, reduce sugar to 1 teaspoon).

Recipe for Double Crust

  • 1 cup butter, unsalted
  • 2 1/2 cups flour
  • 1 teaspoon salt
  • 1 tablespoons sugar
  • 1/3 – 1/2 cup very cold water

Cut the butter into very thin slices and place in freezer for 30 minutes. Meanwhile, mix flour, salt, and sugar in large bowl. Place bowl in freezer for 15 minutes.

Add butter to flour and toss. Using fingers work the butter into the flour with a rubbing action. You still want to be able to see small flakes of butter in the flour. If the butter begins to warm, return bowl to freezer.

Add water, starting with 1/3 cup. Work dough, pressing together. If dough does not begin to hold its shape, add more water, 1 tablespoon at a time. Use only enough to form a ball. It will be crumbly but still hold its shape. Press into disk.

Wrap dough in plastic wrap and refrigerate for 30 minutes to 1 hour.

When ready to use, remove from refrigerator, unwrap, cut in half and roll out on floured surface. Keep the other half wrapped in frig until ready to use.

Pâte Sucrée (sweet dough)

This is a great dough for tarts or freeform galettes. This dough will stand on its own without the support of a pie pan and it is sweeter in flavor.

Recipe for Single Crust

  • 1 1/2 cup flour
  • 1/2 cup butter, unsalted
  • 1/2 teaspoon salt
  • 1/4 cup sugar
  • 1 egg yolk, beaten
  • 2-4 tablespoons very cold water

Cut the butter into very thin slices and place in freezer for 30 minutes. Meanwhile, mix flour and salt in large bowl. Place bowl in freezer for 15 minutes.

Add butter to flour and toss. Using fingers work the butter into the flour with a rubbing action. Continue until dough resembles a course crumble – in this dough you do not want to see small flakes of butter in the flour. If the flour/butter begins to warm, return bowl to freezer.

Add sugar and mix.

Add beaten egg and 2 tablespoons of water. Dump dough onto unfloured surface. If dough does not begin to hold its shape, add more water, 1 tablespoon at a time.

Knead the dough in long smooth strokes three or four times. Form the dough into a ball. Press down forming a disk. (This dough is much smoother than the Pâte Brisée.)

Wrap ball in plastic wrap and refrigerate for 30 minutes to 1 hour.

When ready to use, remove from refrigerator. Unwrap. Using minimal flour on rolling pen, roll out dough on top of the plastic wrap.

 Posted by at 8:04 am
Aug 112012
 

cookies

August is county fair season. And I can safely say that I have never missed a county fair in 25 35, okay, 40-something years. I mean ever! I was born in November and by the following August I was in a baby stroller attending my first fair. From the age of 9 to 19 I showed Jersey cows. Every year my family loaded up bags of feed, hay bales, straw, pitchforks, buckets, brushes, halters, hoses, cattle clippers, and portable milking equipment and headed to the county fair. We would arrive at the fairgrounds with a trailer load of cows from 6 months to 12 years old, filling half the barn. It was always a family affair including grandparents, aunts, uncles, great aunts, great uncles and cousins galore. My Grandfather Bob, along with my father and uncles built many of the barns still there today.

For those of you who may not be familiar with Jerseys, they are a beautiful fawn colored dairy cow. They can be brown and white or can range from very light solid brown to almost black. I should also mention that I grew up in a family with a very sarcastic sense of humor. So what would start off on Monday as very informative answers to common urbanite questions often gave way to quick wit and humor by the end of a very long and exhausting week. One year we had a black Jersey cow in the show herd and by Friday my uncles had convinced most of the innocent city folk passing through that she gave chocolate milk.  Sigh…

cookiesGetting married didn’t end my county fair career, it only perpetuated another generation of county fair goers. Like me, Corey grew up attending his county fair every year. His Grandfather David was fair president and his Grandmother Boots (the other side of the family) manned the information desk for years. As newlyweds, we exhibited purebred sheep and before long our children were following our footsteps showing livestock of their own. They have shown dairy cows, beef cows, sheep, hogs, rabbits and goats. This year my youngest daughter will be showing her very first chickens.

The county fair is so much more than animals, barbeque chicken dinners, carnival rides, and funnel cakes. Oh, don’t misunderstand, those are all important necessities. But the county fair is also the time of year when the whole community comes together to socialize, reconnecting with friends you haven’t seen in years (or since last year) and sharing stories with neighbors. It is the very essence of community.

Inspired by fellow blogger Tara Weaver of Tea & Cookie, I decided to reflect on the community I live in and offer my neighbors some face to face handshakes and hugs. I have met so many wonderful people through my food blog and Twitter. But I also need to remember to take my passion for food, bake a batch of cookies, stir up some sweet tea and share myself with my offline community too.

cookies

When it comes to chocolate chip cookies, there is simply nothing better than the real thing. I always follow the Original Nestle Toll House recipe as reprinted below.

Nestle Toll House Chocolate Chip Cookies
 

Ingredients
  • 2¼ cups all-purpose flour
  • 1 teaspoon baking soda
  • 1 teaspoon salt
  • 1 cup butter or margarine, softened
  • ¾ cup granulated sugar
  • ¾ cup packed brown sugar
  • 1 teaspoon vanilla extract
  • 2 large egg
  • 1 (12 ounce) package semi-sweet chocolate morsels

Instructions
  1. Preheat oven to 375 degrees F.
  2. Combineflour, baking soda and salt in small bowl.
  3. Beat butter, granulated sugar, brown sugar and vanilla extract in large mixer bowl until creamy. Add eggs one at a time, beating well after each addition.
  4. Gradually beat in flour mixture.
  5. Stir in morsels. Drop by rounded tablespoon onto ungreased baking sheets.
  6. Bake for 9 to 11 minutes or until golden brown.
  7. Cool on baking sheets for 2 minutes; remove to wire racks to cool completely.

 Posted by at 8:04 am
Jul 302012
 

Since we began selling Rose Veal at the farmers market, I have had several customers ask for recipes for ground veal. I posted a blog last week on Pasta with Veal, Capers, and White Wine and today I have another great recipe for Veal Stuffed Peppers.

I also have a recipe for Awesome Meatloaf that I will post in coming weeks. It uses a trio of ground meats include pork, beef, and veal.

 stuffed pepper

stuffed peppers

 Veal Stuffed Peppers

  • 1/2-3/4 pound ground veal
  • 1/3 cup long grain rice
  • 2-4* large green peppers
  • Olive oil
  • 1 rib celery, finely diced
  • 1/2 small red onion, finely diced
  • 1 clove garlic, minced
  • 1/4 – 1/2 zucchini, finely diced
  • 1 tomato, finely diced with juices
  • 1/4 cup freshly grated parmesan cheese
  • 3/4 teaspoon dried oregano
  • 1/8 cup flat leaf parsley, chopped
  • 1/4 cup panko bread crumbs

Preheat oven to 350 degrees.

Rinse rice under cold water. Put in small pan with 3/4 cup water and bring to boil. Once boiling, reduce heat to low and cover. Allow rice to sit for 15 minutes. Rice should be slightly soggy.

Slice the tops off of the peppers and remove seeds and stems. Dice tops, leaving the bottoms whole as they will serve as the bowls for the stuffing mix.

In a medium skillet brown veal and drain fat. Add celery, onion, and garlic. Cook for 5 minutes. Add zucchini and tomato and cook until onions are translucent and vegetables start to soften. Salt and pepper to taste.

In a medium bowl, combine cooked rice, oregano, parsley, cooked veal and vegetables, cheese, and most of the breadcrumbs. Stir until evenly distributed.

Spoon stuffing mix into pepper bowls. Place in a loaf pan with one inch of water in the bottom. Sprinkle with additional panko bread crumbs.

Bake for 45 minutes.

When peppers are done remove from oven and top with additional cheese.

Note: As someone who tries to shop seasonally for vegetables from my local farmers market, I tend to improvise quite often in my recipes. I happened to have had beautiful dirt grown tomatoes and zucchinis when I wrote this recipe. Feel free to add, subtract, or swap based on your preferences. Other choices include various types of squash or eggplant. In the winter months I substitute stewed tomatoes.

*Because I add whatever vegetables I have on hand, my stuffing often outgrows my bowls. The above recipe is intended for two large peppers but I often end up with enough stuffing mix for four. If this is the case, simply stuff the extra two peppers and freeze them in a sealed baggy before cooking them. Later I pull them out, allow them to partially thaw, and then bake.

 Posted by at 12:30 pm
Jun 142012
 

homemade breadThere is something relaxing about making bread, once you get past the sticky dough stage. Maybe it is the kneading or the “oh-ah” transformation as it rises or perhaps just those wonderful memories brought on by the smell of fresh baked bread.

My grandmother Hazel (better known as Ho-Ho) was an excellent cook. I never once saw her use a recipe, everything worth cooking or baking she knew by heart. Raising five sons and a daughter on a dairy farm in the mid-twentieth century may have had something to do with that. Of all the things she made, I would say her sweet rolls and sticky buns were her claim to fame. Unfortunately she was diagnosed with Alzheimer’s before anyone thought to get her mental recipes on paper. To this day, I have yet to recreate her mouthwatering breads. And I have tried endless attempts.

I don’t know. Maybe it is just that reality can never match sweet memories. What I do know though is that she gave me a deep soulful, pleasure in baking bread. Right now my favorite go-to bread is a rustic focaccia topped with fresh herbs and salt.

Related Posts Plugin for WordPress, Blogger...

 Posted by at 12:47 pm