Jul 142012
 

There are times when new customers approach us at the farmers market and get frustrated when we don’t have a specific type of meat that they are looking for. Pointing to our canvas sign above the coolers, they remind us that we advertise lamb, goat, beef, pork, and poultry. So where is the {fill in the blank}? Often they totally overlook the word seasonal that precedes our offerings.

We don’t blame them, as most Americans never consider their meat supply as seasonal. Between different climates found in the US, imported meat, the ability to harvest meat within a window of time (think weeks/months vs. hours/days for vegetables), and that wonderful invention we call a freezer we are spoiled.  But if you are someone who appreciates local food, it’s time to take a look behind the scenes.

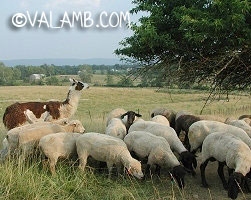
sheep on pastureLAMB

Sheep are wonderful creatures and our favorite livestock here on the farm. As in most places, our sheep naturally lamb in the spring. The spring lamb you eat isn’t really referring to the time it was harvested but when it was born.  We have a huge demand for Easter lamb, and, well, that poses a slight problem. Seldom do we have lambs ready by April or May. The bulk of our lambs are born in January and February and most are harvested at 7 to 9 months. That puts them market ready in September, long after Easter. We have been able to meet the needs of our customers by having a few of our lambs born in the fall.  But that is not an easy task. Sheep breed based on hours of daylight. And try as we may, most like to {snuggle} with the ram between August and November. Picky aren’t they!

GOAT

Goats are a mystery to us most days. There is not a fence that can keep them in (ask Grandma and she’ll point to her garden). We also have a terrible time getting them to breed on our time schedule. Like sheep they are very sensitive to daylight. Several years back an old farmer told us that goats only breed in months with an “R.” Even after confiscating all their daytimers and removing all calendars from the barn — no success. Kidding aside, they definitely have their own schedule and yes, it appears they only breed in months with an “R.” So if they breed in September and October, kid in February and March, we have goat meat available in the fall. Because our herd is relatively small, we haven’t tried lengthening our breeding season into March and April yet.

PORK

We have tried our hand at breeding pigs. We choose two beautiful sows that the kids showed one year. They were calm, easy going, would walk anywhere you wanted them to go. Then they farrowed. And instantly they turned into kill-you-if-they-could beasts. Mean didn’t begin to describe them. With little kids around, we quickly got back out of the pig business.  Now we purchase a group of weaned piglets each spring and fall to raise. Traditionally pork is harvested in the fall when farmers came together as a community for harvesting. The men would scald, hang, and cut up the pork. The women would make sausage, scrapple, and organ meats. It was a flurry of activity. The weather was cool enough to smoke hams and bacon, and it wasn’t so blistering hot over the boiling kettles. Pigs will actually breed any time of year. Our decision for mostly spring born pigs is for two reasons. Our kids like showing market hogs at the county fair in late August. And Farmer (Corey’s Dad) still likes to take an occasional pig to the old timers pig harvest.

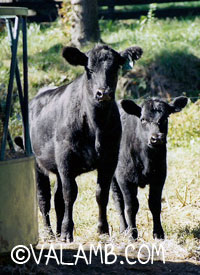
calvesBEEF

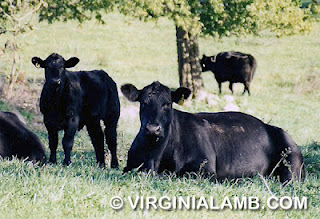
Finally, here is an animal that is eager to please. Cows breed year round and thus should be able to supply us with beef year round. Like most farmers in Virginia we run a cow/calf operation. Meaning we have a herd of mature cows that calve each year. We then sell the weaned calves as our income source. Ideally calves are all born at the same time so that weaning can be done all at once providing us with a uniform a group to market (uniform equates to higher market prices). Although we do not mind calving the herd in smaller groups throughout the year, there is a snag. Grass is most abundant during the spring. Momma cows eat a lot of grass — a must to produce the milk needed to feed their young calves. Spring is the best time to provide enough green, lush grass for milking cows in a pasture raised system. So it is much cheaper and more efficient to calve in the spring. Our calves are harvested at 18 months, thus giving us our best supplies in the fall.

POULTRY

Most breeds of chickens lay eggs year round. Yeah! Now there is a protein source twelve months a year. They definite drop off in production during the winter months, daylight being the culprit, but they do lay eggs in the winter. Eggs can be incubated year round. Chicks can be born year round. Broilers can be raised year round. The only down side is that there isn’t sustainable pasture in the winter months and they must be supplemented with additional feed. Also cold, drafty, damp weather can be stressful if they are not properly protected.  So when you stop by our farm stand and all we have are chicken and eggs, you now know why.

It is the cycle of life, as most species birth in the spring when natural feed sources are most abundant. As producers we try to control our meat supplies the best we can. But part of subscribing to sustainable agriculture is being able to except what nature does best on its own. So the next time you are enjoying summer grown tomatoes or corn on the cob, we hope you will now add meat to the “seasonal” category too.

Each of us associates particular foods with certain times of the year. I love spicy sausage links fresh from the butcher with sauerkraut and creamy potato soup on the first chilly day in autumn. What is your favorite seasonal meat dish?
 Posted by at 1:34 pm
Jul 122012
 

I love this time of year and the ample supply of fresh food off the farm. It begins when asparagus first peaks out of the warming soil and strawberries are begging to be harvested and then continues through dirt grown tomatoes, juicy ripe peaches, and the smells of autumn ushering in the apple harvest.

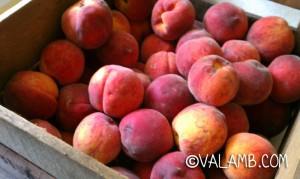
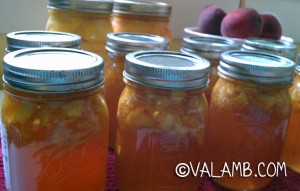
Until I break down and finally plant our own small fruit orchard, I am blessed to be spoiled by Emily at Black Rock Orchard. This past Sunday the boys brought home a bushel of gorgeous peaches from the Dupont Circle Farmers Market. So Jordan and I cleared our schedule and spent the day canning peach halves and peach jam. We even had enough to freeze a little peach sorbet.

In my experience, late season cling free peaches make the pretties jars of canned peach halves (and it never fails those gems always ripen to perfection the week of our county fair!).

Whenever I work with a batch of peaches, I always start out making canned peach halves and am ready to adjust to peach jam if I find it difficult to pit the peaches. As I did today.

Canned Peach Halves

Add water to canner, cover, bring to boil. Keep water simmering. Heat jars and lids in hot, not boiling, water until ready to use. (I wash my jars in the dishwasher, timing it so it hits the dry cycle when I am ready for jars. Then I simply dip lids into hot, almost boiling, water I keep simmering on the stove to sterilize.)

In a separate pan, mix together 2 cups of sugar with 4 cups of water to make light syrup. Bring to a low boil and keep warm. Make more as necessary.

Wash and peel fruit. Dip peaches into boiling water and then cold water for easier peeling. Halve and pit peaches. Prepare enough to pack and fill one jar at a time. Add 1 teaspoon of Fruit Fresh per quart.

Cover fruit with syrup leaving 1/2 inch of head room. Clean rim using a clean, damp cloth to remove any syrup. Place lid on jar and apply band. Adjust until fingertip tight. Repeat with remaining fruit.

Add prepared jars of peaches to water bath and process pints for 20 minutes, quarts for 25 minutes. Make sure water covers top of jars by at least 1-2 inches. Remove from water bath and set on counter to cool.

After cooling, test seals by pressing the center of each lid. If lid does not pop up and down it is sealed. If any lids do not seal properly within 24 hours, refrigerate and eat promptly.

Peach Jam

  • 4 cups peaches, chopped
  • 1/3 cup lemon juice
  • 7 1/2 cups sugar
  • 1 pouch liquid pectin

Add water to canner, cover, bring to boil. Keep water simmering.

Heat jars and lids in hot water until ready to use.

Dip peaches into boiling water and then cold water for easier peeling.  Combine 4 cups of chopped peaches (about 9 regular size peaches), lemon juice, and sugar in heavy bottom pan. Mix well. Bring mixture to a full rolling boil (one that cannot be stirred down) over medium heat, stirring frequently.

Add liquid pectin. Continue hard boil for 1 minute. Remove from heat. Skim foam if necessary.
Ladle hot jam into hot jars, leaving ½ inch head room. Clean rim using a clean, damp cloth to remove any jam. Place lids on jars and apply bands. Adjust until fingertip tight.

Add prepared jars of jam to water bath and process for 10 minutes. Make sure water covers top of jars by at least 1-2 inches. Remove from water bath and set on counter to cool.

After cooling, test seals by pressing the center of each lid. If lid does not pop up and down it is sealed. If any lids do not seal properly within 24 hours, refrigerate and eat promptly.

Peach Sorbet

  • 4 lbs of peaches (roughly 15-16 regular size peaches)
  • 3 cups simple syrup (see below)
  • Juice from two lemons

Dip peaches into boiling water and then cold water for easier peeling. Pit peaches and rough chop. Puree peaches in a food processor or blender. Stir in simple syrup and lemon juice. Taste and adjust to your preference. Freeze in ice cream maker as instructed by manufacturer.

Simple Syrup: 2 cups water + 2 cups sugar. Bring to boil. Let syrup cool before using. Leftover syrup can be stored in glass jar.

Enjoy!

 Posted by at 11:58 am
Jul 112012
 

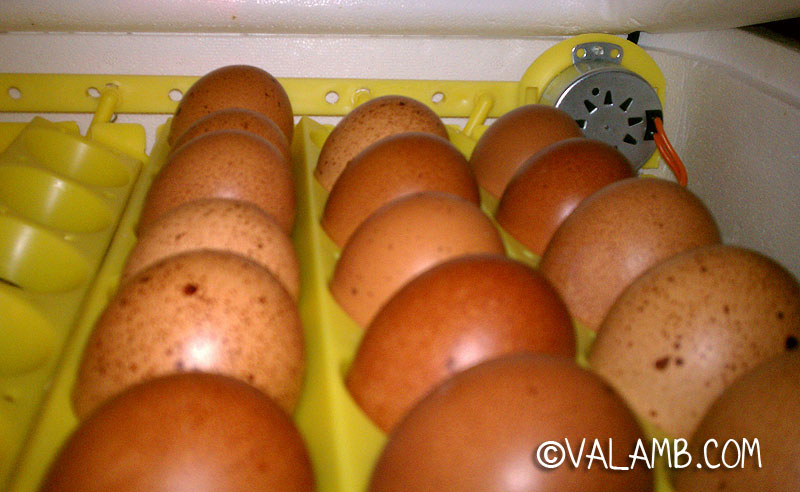
eggs in incubator

The chickens here on the farm are definitely a Mom project. Yes, everyone helps with feeding, watering, and collecting eggs, but I am the one who can sit for hours reading Backyard Poultry magazine or surfing the internet for pictures of chicken tractors. So when we decided to look at making our chicken enterprise more sustainable, I was all over it. I spent hours choosing breeds that would fit our production needs and more hours finding breeders with bloodlines that mirrored our own goals.

For the past ten years, every spring I would pour over the hatchery catalogs, placing my order for pullets (young female birds). Two questions I chose to ignore: First, how close where the chicks I was buying to the original heritage breeds? Think about it. Hatcheries are interested in selling chicks which translates into hens that lay the most eggs. Good when it comes to egg production, but what about other traits, where they being lost? And more importantly what happens to all those male chicks? I didn’t really *want* to think too hard on that question.

So was this sustainable? If our economy as we now know it drastically changed, could I continue raising chickens on the farm without help from outside my local community? Hmm… I didn’t own a rooster and many of my chickens where hybrids at best.  Yep, it was time to establish our own breeding flocks.

I set our very first hatching eggs in our brand new incubator (the Hova Bator 1588 Genesis) in early December. Since then I have done twelve batches of eggs, expanded to an incubator and designated hatcher set-up, and purchased the very best eggs I could find from Vermont to Florida, Pennsylvania to British Columbia, Canada. I have hatched out Coronation Sussex, Light Sussex, Rhode Island Reds, New Hampshires, Black & Lavender Ameraucanas, and French Black Copper Marans.

So how’s it going? Let’s see. I have had hatching rates as good as 88% and as dismal as 0% (you read that right, zero%!). Overall my hatch rates run between 55-65%. And it’s a good year for the rooster as roughly 68% of the chicks born have been males.  Not exactly what I was hoping for.

As expected, it was definitely cheaper and easier to order my spring chicks from hatcheries.  Establishing a quality breeding flock has been a bit tougher than I expected, like taking the long and winding road to an anxious-to-get-there destination. But there is something exciting (borderline addicting) about placing fertile eggs in an incubator and 21 days later having a brood of baby chicks.

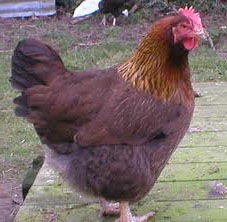
welsummer chicken

Welsummer Hen

So I am back at it again — 19 eggs due to hatch July 21st and 18 more due July 24th. Both of these batches will be Welsummer chicks, a beautiful breed known for their dark speckled eggs.

There are still a few breeds and breeders out there on my purchasing list. Unfortunately with the heat of summer fast upon us, they are going to need to wait until next year. But with any luck, next year I will be hatching out our very own eggs. The next step, finding a broody hen to take over the chore of incubating!

 Posted by at 5:47 pm
Jul 022012
 

We are very proud of our customers and their devoted interest in where their food comes from. It does not surprise us that many have asked us to raise and offer veal along with our other meat selections.

cow calf herdVeal has a rather dark cloud hanging over it, as veal operations have come under more and more scrutiny in recent years. Believe it or not, that gallon of milk you purchased this week has quite a bit to do with the US veal industry.  The commercial dairy farmer has one interest when it comes to cattle – females. Each female calf born grows up to be a productive member of tomorrow’s milking herd. The problem is that statistically 50% of the calves born are bull (male) calves and they are of little or no value to the dairy farmer. Ah, here is where the infamous veal industry comes in, they buy up all the bull calves to raise on milk replacer (powdered milk) to harvest as veal. Little did any of us realize the horrific conditions many of these animals were subjected to in the past.

In stark contrast, take our farm. We have over 180 acres where on any given day you will see cattle, sheep, goats, and chickens enjoying the sunshine and grazing green pastures (and occasionally Grandma’s flower gardens – but that’s another story).  Our animals are happy with free access to feed, clean water, shelter, and companionship. So the question is how to incorporate veal into our operation while staying true to our priority for happy, naturally and humanely raised livestock.

Our family owns and manages a cow/calf beef operation — meaning that we keep a herd of 40-50 mother cows on the farm that calve every spring. Those calves stay with the cows until weaning time when they weigh approximately 400-500 lbs. We then sell them to another farmer who continues to feed them, finishing them to 1100-1200 lbs for harvesting. We keep back a small group of calves to feed out, but simply do not have the pasture nor the market to finish 40+ calves a year.

But wait, when you really think about it, veal could be a very natural part of our operation. So we decided to harvest one of the weanling calves to give it a try. Unlike the pale milk-only fed veal you find in the grocery story you will see that ours has a nice rose color. This is from a combination of sunshine, exercise, mother’s milk, and pasture. And because our veal is from beef breeds (instead of dairy breeds) you can expect it to be flavorful, tender, and meatier. Our veal calves are not artificially raised but left on the cow to be raised the way nature intended and with no undue stress.

We can’t wait to see what you think! Here is a great recipe to get you started.

Veal Marsala

  • 8 veal cutlets or chops
    coarse salt
    freshly ground black pepper
    2 to 3 tablespoons unsalted butter
    2 to 4 tablespoons olive oil
    1 large shallot, finely chopped
    2 to 4 garlic cloves, minced
    2 ounces assorted mushrooms, sliced
    1/2 cup sweet Marsala wine
    3/4 cup chicken stock
    Leaves from 1 fresh rosemary sprig

Season veal with salt and pepper. Melt 1 tablespoon of butter and 1 tablespoon of oil in a heavy large skillet over medium-high heat.

Add 4 veal cutlets and cook until golden brown, about 1 1/2 minutes per side. Transfer the veal to a plate. Add another tablespoon of butter and oil, if necessary.

Repeat with the remaining 4 cutlets. Set cutlets aside.

Add 1 tablespoon of oil to the skillet. Add shallot and garlic. Saute until soft, about 30 seconds. Add a tablespoon of the olive oil, if necessary. Add the mushrooms and saute until tender and the juices evaporate, about 3 minutes. Add the Marsala wine. Simmer until the wine reduces by half, about 2 minutes.

Add the chicken stock and the rosemary leaves. Simmer until reduced by half.

Return the veal to the skillet. Pour in all of the pan juices. Cook just until heated through, turning to coat, about 1 minute. Stir the remaining 1 tablespoon of butter into the sauce.

Season the sauce with salt and pepper, to taste.

Related Posts Plugin for WordPress, Blogger...

 Posted by at 10:56 pm